
The tensile test is a fundamental materials science and engineering test that determines the tensile strength, breaking strength, maximum elongation and reduction in area of a material.
Why Is Tensile Testing Important?
Basically, tensile testing tests the “strength” of a material. In its simplest form, this is achieved by a test machine pulling two ends of a sample in opposite directions until breaking point — this is known as uniaxial tensile testing. Anything can be tested for tensile strength, but different materials will react differently to the same forces, based on their material properties.
Isotropic MaterialsMechanical properties are the same throughout the material |
Example: Glass & Metal |
 |
Anisotropic MaterialsMechanical properties are different throughout the material based on position and direction |
Example: Wood |
 |
Composite MaterialsMixture of isotropic and anisotropic properties |
Example: Carbon Fiber Cable |
 |
We perform tensile tests to know how a material will behave in certain conditions, or under certain stressors. The results of a tensile test help engineers decide how and when to use a material when they are designing a project.
This means that tensile testing helps guarantee the safety of a material. Any time you cross a bridge while driving, or take the elevator up to the top floor of a skyscraper, you don’t have to worry. The materials used to make these engineering marvels are themselves a product of countless hours of tests, including tensile tests.
The simple tensile test gives engineers and construction workers the confidence to know that the steel cables used to support a suspension bridge will be strong enough to support itself and thousands of cars per day and that the steel rebar will be strong enough to hold a skyscraper steady against the forces of wind and gravity.
Steel cables for bridges, rebar for buildings, rail for railroads, and screws and bolts to hold it all together — even if you aren’t an engineer, you can appreciate the benefits of tensile testing.
How to Conduct a Tensile Test and What to Look out for
You could perform your own “tensile test” on a rubber band, pulling it apart until it snapped. However, there is obviously a big difference between a rubber band and an industrial-strength rubber belt used on an assembly line.
A tensile testing machine can apply more force and can gather more accurate data than their human operators alone could do.
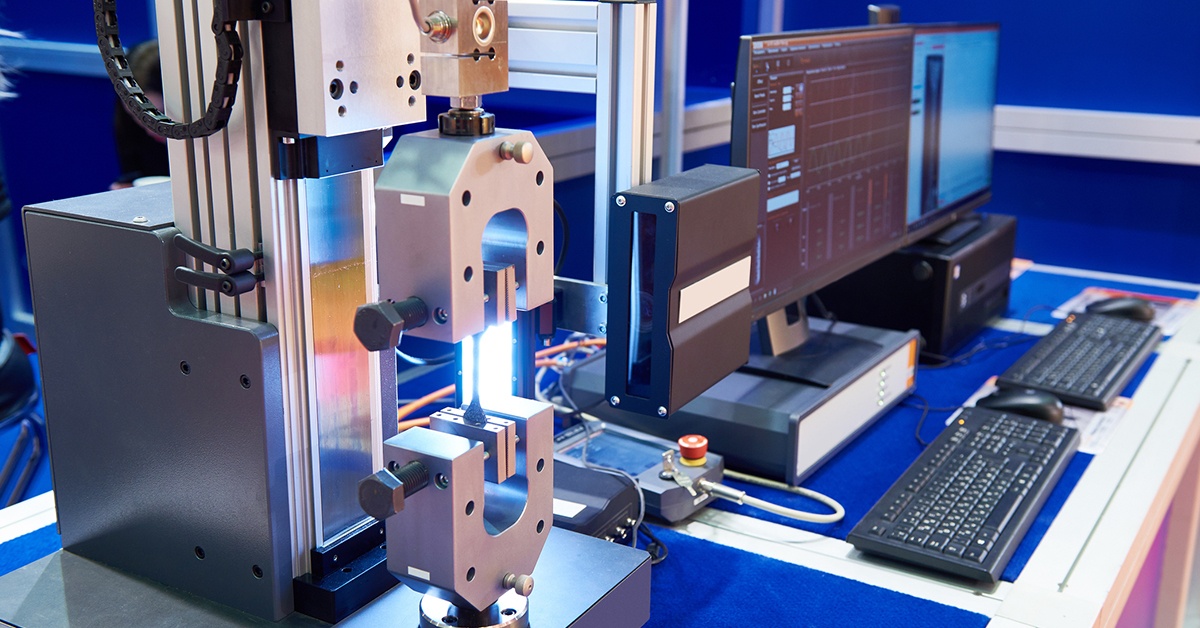
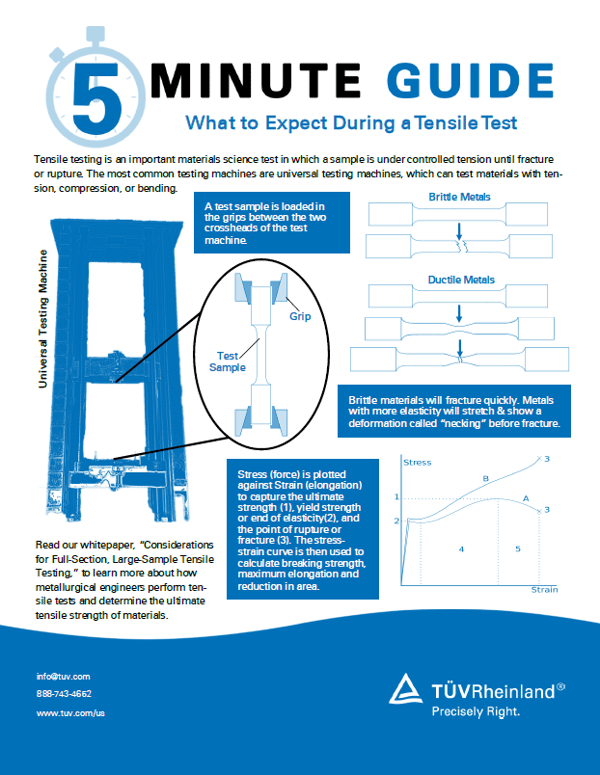
The most common tensile testing machine is the “universal tensile testing machine,” meaning it can test samples with tension, compression, or bending forces. The machine operator loads the test sample, either a full-section test piece or a machined test piece, between the two crossheads and secures the sample with grips.
Usually, one crosshead is static and the other crosshead moves up or down. The type of grip used is determined by not only the type of test and the forces involved, but also the type of material and its shape. There are different grips for round specimens (cable or a screw) and sheet specimens (rubber belt or aluminum siding).
When the test begins, force is applied to the test sample with a hydraulic or electromechanical piston. According to ASM International's Tensile Testing, 2nd Edition, “electromechanical machines are capable of a wider range of test speeds and longer crosshead displacements, whereas hydraulic machines are more cost-effective for generating higher forces.”
Sensors capture the stress-strain curve as a sample is pulled apart by these pistons. An example of a stress-strain curve is illustrated on the right. This example is typical of structural steel, which is a ductile material and shows a definite yield point (2).
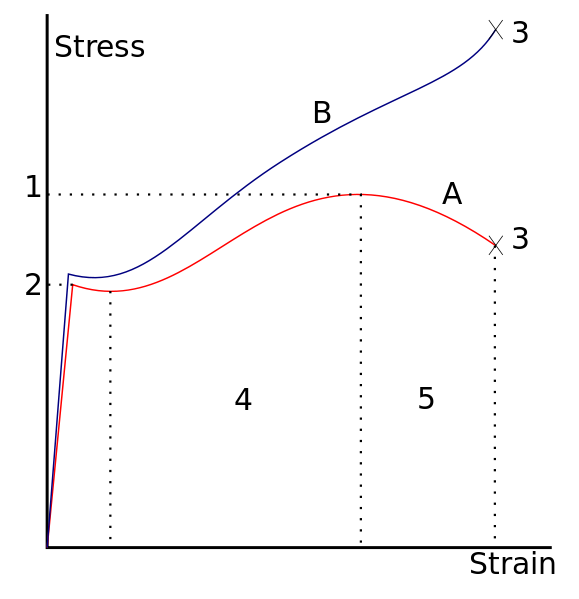
The figure above also marks a few important points on a stress-strain curve found with a tensile test. The yield point marks the point of force where a material no longer exhibits elasticity and will not return to its original size if tension is released.
After this point, the material will continue to stretch and exhibit uniform deformation.
At the ultimate strength point (1), the material being tested will begin to “neck” and stretch unevenly with a noticeably narrower section developing. The point of rupture (3) is when the material breaks and the stress-strain curve drops immediately back to zero. For ductile materials, the tensile strength is the same as the ultimate strength point. Less ductile materials will break, or fracture, before they exhibit a neck, so the point of rupture is taken to be the tensile strength.
Even the same material will show a different stress-strain curve across several tests, especially if there are varying factors such as temperature and speed of force loading. The difference in stress-strain curves between ductile and brittle materials is greater.
The MaterialsSceince2000 video series by the Karlsruhe University of Applied Sciences in Karlsruhe, Germany gives a great demonstration of this difference here.
For more information, speak with our experts: